Misspellings or misrepresentation Tactics
----------------------------------------------
http://www.aresgalaxy.com
http://www.edonkey-software.com
http://www.edonkey-mp3.com
http://www.emule-software.com
http://www.poilet.com
http://www.kaaza.com
http://www.kazza.com
http://www.kaza.com
http://www.kazaalite.com
http://www.kazaa-lite.tk
http://www.k-lite.tk
http://www.kazaalite.nl
http://www.kazaa-download.de
http://www.kazaagold.com
http://k-litetk.com
http://www.kazaalite.de - Beware, links on the page prompt for download of star dialer.
http://www.kazaa.de - Same as kazaalite.de. Again, beware of star dialer.
http://www328.ws1.internetservice.com - Same as kazaa.de and kazaalite.de.
http://www.kazaa-file-sharing-downloads.com - Fishy executable present here.
http://www.klitesite.com
http://www.klite.tk
http://freewebhosting.hostdepartment.com/k/kazaalitetk - Redirects to klitesite.com.
http://kazaa.freakin.nl
http://www.kazaa-gold.com - I discovered this site while reading Sharmans copyright infringment complaint to google.com.
http://www.kazaamedia.com
http://www.kazaaplatinum.com
http://www.kazaa-plus.net
http://www.kl-kpp.net
http://www.kazaa.co.kr
http://www.ikazaa.net
http://www.supernova.org
http://www.suprnova.com
http://www.slsk.org - Old soulseek domain, that now links to a mainpeen dialer (scumware).
http://www.sharaza.com
http://www.winmx-download-winmx.com - WinMX based scam.
http://www.musicdonkey.net/
----------------------------------
Regular P2P scam type sites
----------------------------------
http://www.fileminer.com
http://www2.music-download-network.com
http://filmgimp.org
http://www.filesharingfriends.com
http://www.mp3ebook.com
http://www.symynet.com/educational_software/kazaa_light.htm - Looks to me to be just a cheap plug for an amazon.com product (an MP3 CD player).
http://www.bolton-heaton.freeserve.co.uk/kazaa.htm - Not only do they link to yet another scam site, they also link to many forms of adware and spyware including
gator and aluriaaffiliates.
http://www.emp3downloadhq.com
http://www.unlimitedshock.com
http://www.songs4free.com
http://www.mp3u.com
http://download-central.mp3u.com
http://www.americamp3network.com
http://www.mp3university.com
http://www.downloads-unlimited.com
http://www.download-mp3-now.com
http://www.imusicshare.com
http://www.musicdownloadcentral.com
http://www.downloadsociety.com
http://www.mp3musiczone.com
http://www.mp3rocks.net
http://www.247downloads.com
http://www.mymusicinc.com
http://www.mp3advance.com
http://www.songfly.com
http://www.mp3musicworld.com
http://www.charliespiano.com/downloadable_music.php - Links to an existing scam site.
http://www.freeality.com/emusic.htm
http://www.free-mp3-music-player-downloads.com
http://www.mp3yes.com
http://www.mp3.abandonware.nu
http://www.mp3high.com
http://www.mp3shock.net
http://www.mp3advance.com - This one was being displayed on BeatKing through the Google ads
http://www.my-free-music.com
http://www.findanymusic.com - Claims it's legal; obviously a scam.
http://www.xvidmovies.com/ - The main culprit is (http://www.xvidmovies.com/movies/)
http://www.moviedownloadcity.com
http://www.hqmovies.net
http://www.gettingmovies.com/Movies.html
http://www.compareshopsave.com/moviesites
http://k-lite-legal.com - Another claim of legality.
http://www.imovieshare.com
http://www.easymusicdownload.com
http://www.flicksunlimited.com
http://www.completemovies.com/index2.html
http://www.download-mp3-music.com
http://www.freemovieserver.com
http://www.mp3perfect.com
http://www.mp3downloadcity.com
http://www.downloadshield.com
http://www.legacymp3.net
http://www.crazymp3s.org
http://www.21-century-mp3.nu
http://www.greekmusicmp3s.com
http://www.filesharingcenter.com
http://www.unlimitedshock.com
http://www.mp333.com
http://www.mp3madeeasy.com
http://www.mp3grandcentral.net
http://www.mp3-network.com
http://www.morpheusultra.com
http://www.flixs.net
http://www.charliespiano.com/downloadable_music.php
http://www.compareshopsave.com/moviesites
http://www.completemovies.com/index2.html
http://www.ondemandmp3.com

Services Offered
CCTV
Mar 23, 2009

How to change your Computer's CMOS Battery
First the safety rules
The inside of a computer is a bad place full of electricity and sharp edges.
On the electricity side always when working on you computer make sure that it’s still plugged in to the power socket and the power is turned off, this is to ensure that any static
From you is discharged through the earth. The inside of most computer cases are unfinished metal and has very sharp edges so be careful.
The first signs of a battery failing are:-
1) your clock starts running slowly
2) when you boot (start) your computer it has a problem finding your hardware (no hard drive, no cd rom)
To change the battery you need the following tools
1) a X-point screwdriver
2) an anti-static strap(optional)
3) a new battery (seems logical)
Then unplug all the cables from the back of the computer as you remove them make a note where they came from. (So when you finished you can put them back)
Move the computer somewhere where you can work on it with ease
Remove the cover by locating the screws around the outer edge (back) of the computer
Some computer cases only require you to remove 2 screws on one side then a panel can be removed allowing you access to the computers insides, others you must remove 6 screws and remove the whole case by sliding it to the rear and lifting it off.
Now make sure that you read the safety instructions about static.
Look inside you will see a round silver thing that looks about the size of a 10p piece (quarter). This is the battery itself, carefully lift the retaining clip and slide the battery out. That’s it removed now go to your local computer retailer, electrical retailer (Tandy/Radio shack) taking the old battery with you and get a new battery.
Back to your computer insert the new battery by lifting the clip and sliding the battery in.
Reinstall your case and plug all the cables back (you did remember to label them didn’t you)
Now for the fun part.
You will now need to go into you bios….
Right the bios is the god of your computer.
To access it, when your computer first starts you will see a black screen with white text.
If you look carefully you will see a line that says something like "press del for setup" or some other key (F2 or ESC or tab) this will take you to god's house where you can make lots of changes to the way your machine works.
It is also the place where you can make your nice computer in to a rather expensive door stop so be careful and don’t go playing with anything.
You will now be presented with a blue screen with a lot of options on it,
The one we want is load optimised/default settings.
Press the F10 key and type y the computer should now reboot.
If every thing went well then your computer will now be up and running.
Shizers way: Keep computer running. Lay it on it's side and remove side cover to expose MoBo. Take any thin object, "small screwdriver, knife point, wood shiskabob skewer. Pull back the battery retaining clip. Toss the old battery in the junk recepticle, unless you belong to greenpeace and want to save the earth. Install the new battery. No need to reset bios becasue the compter supplies voltage to the cmos while it is running. Reset or resync clock with internet. Done!
The inside of a computer is a bad place full of electricity and sharp edges.
On the electricity side always when working on you computer make sure that it’s still plugged in to the power socket and the power is turned off, this is to ensure that any static
From you is discharged through the earth. The inside of most computer cases are unfinished metal and has very sharp edges so be careful.
The first signs of a battery failing are:-
1) your clock starts running slowly
2) when you boot (start) your computer it has a problem finding your hardware (no hard drive, no cd rom)
To change the battery you need the following tools
1) a X-point screwdriver
2) an anti-static strap(optional)
3) a new battery (seems logical)
Then unplug all the cables from the back of the computer as you remove them make a note where they came from. (So when you finished you can put them back)
Move the computer somewhere where you can work on it with ease
Remove the cover by locating the screws around the outer edge (back) of the computer
Some computer cases only require you to remove 2 screws on one side then a panel can be removed allowing you access to the computers insides, others you must remove 6 screws and remove the whole case by sliding it to the rear and lifting it off.
Now make sure that you read the safety instructions about static.
Look inside you will see a round silver thing that looks about the size of a 10p piece (quarter). This is the battery itself, carefully lift the retaining clip and slide the battery out. That’s it removed now go to your local computer retailer, electrical retailer (Tandy/Radio shack) taking the old battery with you and get a new battery.
Back to your computer insert the new battery by lifting the clip and sliding the battery in.
Reinstall your case and plug all the cables back (you did remember to label them didn’t you)
Now for the fun part.
You will now need to go into you bios….
Right the bios is the god of your computer.
To access it, when your computer first starts you will see a black screen with white text.
If you look carefully you will see a line that says something like "press del for setup" or some other key (F2 or ESC or tab) this will take you to god's house where you can make lots of changes to the way your machine works.
It is also the place where you can make your nice computer in to a rather expensive door stop so be careful and don’t go playing with anything.
You will now be presented with a blue screen with a lot of options on it,
The one we want is load optimised/default settings.
Press the F10 key and type y the computer should now reboot.
If every thing went well then your computer will now be up and running.
Shizers way: Keep computer running. Lay it on it's side and remove side cover to expose MoBo. Take any thin object, "small screwdriver, knife point, wood shiskabob skewer. Pull back the battery retaining clip. Toss the old battery in the junk recepticle, unless you belong to greenpeace and want to save the earth. Install the new battery. No need to reset bios becasue the compter supplies voltage to the cmos while it is running. Reset or resync clock with internet. Done!
Dec 31, 2008
Disabled Task Manager and Regedit? Here's How
Regedit and Task Manager has been restricted due to virus and even though the virus has been deleted, the restrictions are still present and it's really annoying that you cannot access Task Manager (CRTL+ALT+Del) and Regedit.
First, You have to Scan your PC with your Anti virus and reboot, After reboot, You may now apply the following.
For Regedit.
Start > Run and type the following exactly between and without the
Quotes ("")
"REG DELETE
HKCU\Software\Microsoft\Windows\CurrentVersion\Policies\System /v
DisableRegistryTools"
and/or
"REG DELETE
HKLM\Software\Microsoft\Windows\CurrentVersion\Policies\System /v
DisableRegistryTools"
----------------
For the Task Manager
For Windows XP Pro, use Group Policy Editor (Start > Run > gpedit.msc)
then navigate to:
User Configuration > Administrative Templates > Windows Components >
System > Ctrl+Alt+Del Options. Set "Remove Task Manager" as Not
Configured.
------
For XP Home or Pro, use the Registry editor (Start > Run > regedit.exe)
Navigate to the following sub key:
[HKCU\Software\Microsoft\Windows\CurrentVersion\Policies\System]
and/or
[HKLM\Software\Microsoft\Windows\CurrentVersion\Policies\System]
Name: DisableTaskMgr
Type: DWORD
Value: 0 - Unrestricted; 1 - Restricted
Or in the right-hand pane, delete "DisableTaskMgr".
-------
An automated fix for XP Home or Pro,
Download and merge the following file from this site.
http://www.lprf.ca/files/tsk.mngr.dsbld.reg
Download "tsk.mngr.dsbld.reg" to your desktop. Right click
"tsk.mngr.dsbld.reg" to select Merge.
If you want to view the contents of the file, simply right-click
"tsk.mngr.dsbld.reg" to select Edit.
--
First, You have to Scan your PC with your Anti virus and reboot, After reboot, You may now apply the following.
For Regedit.
Start > Run and type the following exactly between and without the
Quotes ("")
"REG DELETE
HKCU\Software\Microsoft\Windows\CurrentVersion\Policies\System /v
DisableRegistryTools"
and/or
"REG DELETE
HKLM\Software\Microsoft\Windows\CurrentVersion\Policies\System /v
DisableRegistryTools"
----------------
For the Task Manager
For Windows XP Pro, use Group Policy Editor (Start > Run > gpedit.msc)
then navigate to:
User Configuration > Administrative Templates > Windows Components >
System > Ctrl+Alt+Del Options. Set "Remove Task Manager" as Not
Configured.
------
For XP Home or Pro, use the Registry editor (Start > Run > regedit.exe)
Navigate to the following sub key:
[HKCU\Software\Microsoft\Windows\CurrentVersion\Policies\System]
and/or
[HKLM\Software\Microsoft\Windows\CurrentVersion\Policies\System]
Name: DisableTaskMgr
Type: DWORD
Value: 0 - Unrestricted; 1 - Restricted
Or in the right-hand pane, delete "DisableTaskMgr".
-------
An automated fix for XP Home or Pro,
Download and merge the following file from this site.
http://www.lprf.ca/files/tsk.mngr.dsbld.reg
Download "tsk.mngr.dsbld.reg" to your desktop. Right click
"tsk.mngr.dsbld.reg" to select Merge.
If you want to view the contents of the file, simply right-click
"tsk.mngr.dsbld.reg" to select Edit.
--
Jul 1, 2008
System Restore
Time Travel with System Restore
I feel your pain... unless you are very careful, you can download a new program or software update, then find that it makes your system unstable. Wouldn't it be nice if you could go back to a point in time when your computer was working? With System Restore, you can.
Think of System Restore as the Undo command for Windows. While your computer is on, System Restore takes regular snapshots of your Windows configuration, settings, and program files. These snapshots (known as "restore points") are stored on your hard disk so you can revert back to that point in the event of a computer emergency. Restore points are automatically created when new software is installed, when Windows Update applies changes, on a daily basis, and when you request a manual restore point. If you can remember the most recent time when your computer was working correctly, System Restore will roll back all system changes to that point.
I feel your pain... unless you are very careful, you can download a new program or software update, then find that it makes your system unstable. Wouldn't it be nice if you could go back to a point in time when your computer was working? With System Restore, you can.
Think of System Restore as the Undo command for Windows. While your computer is on, System Restore takes regular snapshots of your Windows configuration, settings, and program files. These snapshots (known as "restore points") are stored on your hard disk so you can revert back to that point in the event of a computer emergency. Restore points are automatically created when new software is installed, when Windows Update applies changes, on a daily basis, and when you request a manual restore point. If you can remember the most recent time when your computer was working correctly, System Restore will roll back all system changes to that point.
Will I Lose Personal Files?
So what exactly does System Restore do? Let's start with what it doesn't do... System Restore WILL NOT remove or modify any personal data files such as word processor documents, spreadsheets, music & photos, web favorites, emails, etc. More specifically, files in the My Documents folder will never be touched. If you are unsure as to whether a file will be affected by System Restore, keep it in that folder. System Restore WILL affect your Windows system settings (the Windows Registry), protected system files, and recently installed software.
While System Restore can be a wonderful tool to get your computer back to a functioning state after a virus or spyware infestation, I strongly recommend that you use it only in such emergencies. If you have installed a program and suspect that it may be causing trouble, always try Add and Remove Programs in Control Panel first. I offer this caution because System Restore is a rather drastic measure. On the few occasions I've used it, System Restore did solve the problem at hand, but some minor things like fonts, wallpaper and desktop settings were altered. It also messed up my Internet Explorer toolbars, even though they were supposedly locked. Things like this (that I did notice) make me wonder if other unexpected or undesired changes were made as well.
Running System Restore 

If your computer seems to be unstable, you've done a thorough anti-virus and anti-spyware scan, and you've been unable to remove any suspected software packages thr
 ough ControlPanel, give System Restore a try. To roll back your computer settings to a previously saved restore point:
Click the Start button, then select Programs / Accessories / System Tools
Click System Restore.
Choose "Restore my computer to an earlier time" then click Next.
Select a day on the calendar, a restore point description, then click Next.
When System Restore begins, the computer will restart, the hands on your wall clock will spin backwards, and a groovy technicolor swirl will envelope the room. You may hear an audible moan and see smoke rising from your computer as the hard drive grinds. And with a bit of luck your system will be restored to normal functioning.
Hard Drive Failure?
Generally a clicking sound coming from your hard drive is a Bad Omen. It could be a harbinger of horrific hardware happenings, so my immediate advice is "BACKUP YOUR HARD DRIVE!" as soon as possible. If the drive fails, you're out of luck. In fact, even if you don't suspect a problem with your hard drive, it's wise to make regular backups so you can survive a hard drive failure with only minimal inconvenience. See my article Backing Up Your Files to learn about backup strategies, hardware and software.
Scan Your Drive
On Windows XP, you can check your hard drive for errors by running the CHKDSK utility. Restart your computer and hold down the Ctrl key while it's booting up. When you see the option to start your system in Safe Mode, select it and continue. Click the Start button, then click Run, then type CHKDSK C: /F /R then press Enter. The /R option tells CHKDSK to scan for bad disk sectors, and the /F option means to fix any errors found. (On a Windows 98 system, use the SCANDISK command instead of CHKDSK.)
If CHKDSK offers to "convert lost chains to files", recover lost data, or fix something else, you should accept. (If CHKDSK tries to sell you a cheap Rolex, politely decline the offer.) After CHKDSK finishes, restart your computer normally and see if the dreaded click of doom returns. If so, the drive is most likely damaged, and should be replaced as soon as possible. If you decide to purchase a new computer, see Copying Old Hard Drive to New PC for help with transferring your files.
Are You On The Level?
But before you trash your troublesome drive, you should try one more thing... Some hard drives are very sensitive to non-level surfaces, and will not function properly if they're sitting on a slant. Shut down your computer, make sure your system unit is on a flat surface (use a level to make sure), and then restart. I was all set to give up on an older computer that was doing the click/whir routine, but I noticed it wasn't sitting on a level surface. As soon as I fixed that, the problem was gone!
That clicking sound MAY signal impending hard drive failure, but keep in mind you don't always get such a warning. So play it safe... back up your files on a regular basis.
Need more inspiration to back up your hard drive? Listen to music based on the sounds of hard drive failure!Fiddling While Your Hard Drive Crashes will haunt your dreams until your data is safe.
Generally a clicking sound coming from your hard drive is a Bad Omen. It could be a harbinger of horrific hardware happenings, so my immediate advice is "BACKUP YOUR HARD DRIVE!" as soon as possible. If the drive fails, you're out of luck. In fact, even if you don't suspect a problem with your hard drive, it's wise to make regular backups so you can survive a hard drive failure with only minimal inconvenience. See my article Backing Up Your Files to learn about backup strategies, hardware and software.
Scan Your Drive
On Windows XP, you can check your hard drive for errors by running the CHKDSK utility. Restart your computer and hold down the Ctrl key while it's booting up. When you see the option to start your system in Safe Mode, select it and continue. Click the Start button, then click Run, then type CHKDSK C: /F /R then press Enter. The /R option tells CHKDSK to scan for bad disk sectors, and the /F option means to fix any errors found. (On a Windows 98 system, use the SCANDISK command instead of CHKDSK.)
If CHKDSK offers to "convert lost chains to files", recover lost data, or fix something else, you should accept. (If CHKDSK tries to sell you a cheap Rolex, politely decline the offer.) After CHKDSK finishes, restart your computer normally and see if the dreaded click of doom returns. If so, the drive is most likely damaged, and should be replaced as soon as possible. If you decide to purchase a new computer, see Copying Old Hard Drive to New PC for help with transferring your files.
Are You On The Level?
But before you trash your troublesome drive, you should try one more thing... Some hard drives are very sensitive to non-level surfaces, and will not function properly if they're sitting on a slant. Shut down your computer, make sure your system unit is on a flat surface (use a level to make sure), and then restart. I was all set to give up on an older computer that was doing the click/whir routine, but I noticed it wasn't sitting on a level surface. As soon as I fixed that, the problem was gone!
That clicking sound MAY signal impending hard drive failure, but keep in mind you don't always get such a warning. So play it safe... back up your files on a regular basis.
Need more inspiration to back up your hard drive? Listen to music based on the sounds of hard drive failure!Fiddling While Your Hard Drive Crashes will haunt your dreams until your data is safe.
Jun 11, 2008
Defragment Your Hard Drive For Improved Performance
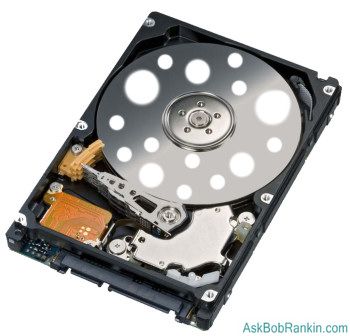 So what does it mean to defrag your hard drive? As you work with your computer, you will create and delete thousands of files on your hard drive. Over time, this churn leaves areas of empty space on your hard drive. Eventually you have a hard drive that looks like swiss cheese, and when you want to install a new program, or create a new file, your computer has to put chunks of your file all over the disk, instead of storing it in one contiguous block. This will result in extra time required to open files and launch applications, because everything is scattered (or fragmented) around your hard drive.
In order to fix this, there are programs available called defragmenters. When you defragment your hard drive, the program will move those scattered chunks of data so that files are stored contiguously, and create larger areas of free space to store files in the future. After drefagging, your computer has less work to do in order to open files and load programs. This is why defragmenting your hard drive is important.
How To Defragment Your Hard Drive
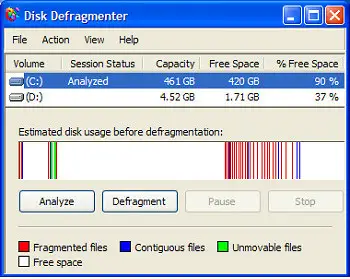 If you run Windows, your computer already has a free defragmenting program on it. Windows Defragmenter is provided with your Windows operating system. To begin, start by closing all your Windows programs. You might want to run your Defragmenting program in the evening, when you are finished with other work.
Click on the Start button, which is over on the bottom left part of your screen. Select Programs. Then select Accessories. Select System Tools. In System Tools, you'll find something called Disk Defragmenter.
From this program, you can select the hard drive that you want to defrag. Typically that's the C: drive, but if you have multiple drives, you can do them all. Press the Analyze button after selecting the drive, and Defrag will tell you if the drive needs to be defragmented. Lots of colored bars scattered all over the graph usually means you need to defrag. When most of the colored bars are over on the left side of the graph, that's good. Click the Defragment button to begin the defrag process.
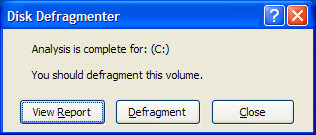 If it has been a long time since you've last used it, or if you have a large hard drive with lots of files, it could take several minutes (or even hours) to complete. Defrag will show you the before and after snapshots of the defrag process.
Mac users, keep reading -- there's some defrag love in the next section for you...
I recommend that you defragment your computer regularly. Once a month should be enough, though do it more if you're a very active user, or you regularly deal with large (multi-megabyte) files such as music, video or graphics. If you have Windows Vista, the Disk Defragmenter offers you the option to run the program on a regular schedule.
Other Defragmenting Software
There are other defrag software programs available besides the one built into Windows. Some of these programs do a more thorough job of defragmenting your drive, and offer advanced features you might like.
Diskeeper is a popular commercial defragmenter. The newest version scans and fixes your computer in real time. So when you delete a program or file, it readjusts your hard drive right then. This eliminates the need to actually go in and run the program, taking minutes or hours out of your day to run the program.
DiskMagik is another good choice. It runs its disk defragmenter throughout the day, plus it'll learn when your slow times are, so it can adjust. It'll use fewer resources throughout the times when you use the computer more.
And Mac OS X users, I haven't forgotten you... Apple recommends a program called Drive Genius which will defrag, repair, repartition and do other maintenance tasks on your Mac. Other Mac savvy folks recommend iDefrag.
These programs are optional, but if you're the type of person who wants to squeeze every bit of performance out of your system, an advanced defragger is highly recommended. These programs eliminate the need to actually remember to run your disk defragmenter, and they'll optimize your disk. A fast and clean hard drive will really make a difference and improve your computer's performance
Jun 6, 2008
Tips on Buying a Personal Computer
This is an article I've read from www.selfgrowth.com, an article written by Rick Sheridan. This is very helpful to people who are planning to buy a PC.
Author's Bio
Rick Sheridan is a PhD student who has developed a free online health course for senior citizens. This distance education course teaches seniors how to use the Internet for their health and medical research. See the course at: http://ComputerAccessible.com
Buying a computer is a major purchase and you should study the options carefully. The two main types of computer operating systems are the PC (Windows) and Macintosh. Since PC's dominate about 90% of the market, this report will focus on them, although many of the tips will also apply to the Macintosh computers.
Factors to Consider:
Buy from a Reputable Dealer- before you buy your next computer, check the warranty. One year is average, three is better. Will the technician come to you or do you have to bring the machine in? What is the average turn around time for their repairs? If you are expected to deal with telephone technical support, test the number to see if you get constant busy signals. Check out Consumer Reports and other publications dedicated to evaluating warranties and computer quality. I would generally recommend buying locally if the price is anywhere near what you can get via mail order. Also, an extended warranty is usually worth it.
How will you use the computer- Knowing how you'll use your computer will help you determine what type of minimum requirements the computer needs to have. For example, computers that run graphic design programs generally need more memory (RAM) than computers used for simple word processing operations. The size of the software you plan to run will dictate how much memory your computer should have. Be sure to check the inventory of what's on the computer, so you'll know what you're getting. Salesmen will often try to make you feel as if you need the maximum memory offered (at a higher price). Often you don's need all that power for common operations.
How Much Should You Spend- Depending on your needs, be prepared to spend between $500 for an entry-level computer to $3,000 for a high-end computer. Take into consideration whether the monitor is included or costs extra. Sometimes printers, scanners and software are included in the deal. Be sure to purchase a surge protector, a software backup system (CD burner or Zip drive), along with anti-virus and a troubleshooting program (such as Norton Utilities).
Computer Terminology Glossary
Here are some basic computer terms that will help you understand what the salesman is talking about:
CD-ROM Drive: Most new computers come with a CD-ROM drive as standard equipment. CD's store lots of data and are the normal way to install new programs.
CPU: The CPU, or central processing unit, is the brains of the computer and performs many of the operations. Most Windows-based programs use a Pentium processor.
Disk Drive: Virtually all computers come with a disk drive that can read and save information on portable diskettes, also called floppy disks. You can use floppy disks to save information or to load new software onto your computer.
Hard Drive: The hard drive also is called the hard disk. You'll probably never see it because it is nestled inside your computer. It's the computer's electronic filling cabinet, and it stores the computer's operating system, files, programs and documents.
Keyboard: Just like a typewriter keyboard, this device is the way of inputting data into the software that you will be operating.
Megahertz (MHz): This is the clock speed of the microprocessor. The higher the number, the quicker the information is processed. MHz relates to how many millions of instructions can be processed per second.
Memory: This is the circuitry or device that holds information in an electrical or magnetic form. There is read-only memory (ROM), which is information primarily stored on a disk, and random-access memory (RAM), which is chip-based storage inside the computer. Memory is typically measured in megabytes (MBs).
Modem: This mechanism connects a computer to a phone line so information can be sent from one computer to another or the user can access an on-line service or the Internet. In view of the popularity of the Internet, a modem is now considered basic equipment and comes on practically all new computers. Most modems come with fax capabilities, too. Faster Internet speeds are available with DSL or cable connections.
Monitor: An output device that allows you to see what you are doing. Older computers came with 14 or 15 inch monitors. Many new computers have 17 or 21 inch monitors, but they often cost extra.
Motherboard: The motherboard is the circuit board that everything in the computer plugs into. The CPU, RAM and cache all plug into the motherboard.
Mouse: The mouse is another input device that makes getting around in your computer easier. It is a handheld object that is good for doing tasks such as moving and pointing to objects on the screen, and can replace the function and control keys of the keyboard.
Printer: A printer is an essential part of the computer if you want a hard copy of your work. There are three main types of printers on the market: inkjet, bubble jet and laser. Most inkjets and bubble jets can print color and graphics, and a laser printer offers the best resolution at the highest speed (and price).
RAM: Computers save data in two ways: on the hard drive (permanently) and in random access memory (temporarily while the software is running). New computer buyers should look for models with at least 128 MBs of RAM (or more, depending on what types of programs you'll be running). Make sure that the computer can be upgraded.
Scanner: This device can input written documents, pictures or photographs directly into your computer. There are three types of scanners: handheld, hopper-feed and flatbed.
Sound Card: This device allows your computer to reproduce music, sounds and recorded voices. Make sure you have a sound card if you're planning to play multimedia games.
Video Card: The video card is the part of the computer that sends the images to the monitor.
Computer Buyer's Checklist-
Before you walk into a computer store or call a mail order source, go over the list of the items (hardware and software) that you might consider purchasing. Ask the salesperson questions about the computer you are interested in and jot down your notes.
Processor type
_____________________________________________
Processor Speed in MHz
_____________________________________________
RAM (memory)
_____________________________________________
Cache
_____________________________________________
Hard Drive Capacity
_____________________________________________
Sound & Video Card
_____________________________________________
Monitor Size? Is it included in the price?
_____________________________________________
Printer: Is it included in the price?
_____________________________________________
Type of Printer (inkjet, bubble jet, laser)
_____________________________________________
Modem (internal, external, speed)
_____________________________________________
Can you set up a fax or voice mail on the modem?
_____________________________________________
Is there a toll-free technical support phone number?
_____________________________________________
What cables are needed to set up the system?
_____________________________________________
Are there any additional accessories that might be useful, e.g., storage cases, furniture, extra cabling, anti-glare screen for monitor?
________________________
Author's Bio
Rick Sheridan is a PhD student who has developed a free online health course for senior citizens. This distance education course teaches seniors how to use the Internet for their health and medical research. See the course at: http://ComputerAccessible.com
Buying a computer is a major purchase and you should study the options carefully. The two main types of computer operating systems are the PC (Windows) and Macintosh. Since PC's dominate about 90% of the market, this report will focus on them, although many of the tips will also apply to the Macintosh computers.
Factors to Consider:
Buy from a Reputable Dealer- before you buy your next computer, check the warranty. One year is average, three is better. Will the technician come to you or do you have to bring the machine in? What is the average turn around time for their repairs? If you are expected to deal with telephone technical support, test the number to see if you get constant busy signals. Check out Consumer Reports and other publications dedicated to evaluating warranties and computer quality. I would generally recommend buying locally if the price is anywhere near what you can get via mail order. Also, an extended warranty is usually worth it.
How will you use the computer- Knowing how you'll use your computer will help you determine what type of minimum requirements the computer needs to have. For example, computers that run graphic design programs generally need more memory (RAM) than computers used for simple word processing operations. The size of the software you plan to run will dictate how much memory your computer should have. Be sure to check the inventory of what's on the computer, so you'll know what you're getting. Salesmen will often try to make you feel as if you need the maximum memory offered (at a higher price). Often you don's need all that power for common operations.
How Much Should You Spend- Depending on your needs, be prepared to spend between $500 for an entry-level computer to $3,000 for a high-end computer. Take into consideration whether the monitor is included or costs extra. Sometimes printers, scanners and software are included in the deal. Be sure to purchase a surge protector, a software backup system (CD burner or Zip drive), along with anti-virus and a troubleshooting program (such as Norton Utilities).
Computer Terminology Glossary
Here are some basic computer terms that will help you understand what the salesman is talking about:
CD-ROM Drive: Most new computers come with a CD-ROM drive as standard equipment. CD's store lots of data and are the normal way to install new programs.
CPU: The CPU, or central processing unit, is the brains of the computer and performs many of the operations. Most Windows-based programs use a Pentium processor.
Disk Drive: Virtually all computers come with a disk drive that can read and save information on portable diskettes, also called floppy disks. You can use floppy disks to save information or to load new software onto your computer.
Hard Drive: The hard drive also is called the hard disk. You'll probably never see it because it is nestled inside your computer. It's the computer's electronic filling cabinet, and it stores the computer's operating system, files, programs and documents.
Keyboard: Just like a typewriter keyboard, this device is the way of inputting data into the software that you will be operating.
Megahertz (MHz): This is the clock speed of the microprocessor. The higher the number, the quicker the information is processed. MHz relates to how many millions of instructions can be processed per second.
Memory: This is the circuitry or device that holds information in an electrical or magnetic form. There is read-only memory (ROM), which is information primarily stored on a disk, and random-access memory (RAM), which is chip-based storage inside the computer. Memory is typically measured in megabytes (MBs).
Modem: This mechanism connects a computer to a phone line so information can be sent from one computer to another or the user can access an on-line service or the Internet. In view of the popularity of the Internet, a modem is now considered basic equipment and comes on practically all new computers. Most modems come with fax capabilities, too. Faster Internet speeds are available with DSL or cable connections.
Monitor: An output device that allows you to see what you are doing. Older computers came with 14 or 15 inch monitors. Many new computers have 17 or 21 inch monitors, but they often cost extra.
Motherboard: The motherboard is the circuit board that everything in the computer plugs into. The CPU, RAM and cache all plug into the motherboard.
Mouse: The mouse is another input device that makes getting around in your computer easier. It is a handheld object that is good for doing tasks such as moving and pointing to objects on the screen, and can replace the function and control keys of the keyboard.
Printer: A printer is an essential part of the computer if you want a hard copy of your work. There are three main types of printers on the market: inkjet, bubble jet and laser. Most inkjets and bubble jets can print color and graphics, and a laser printer offers the best resolution at the highest speed (and price).
RAM: Computers save data in two ways: on the hard drive (permanently) and in random access memory (temporarily while the software is running). New computer buyers should look for models with at least 128 MBs of RAM (or more, depending on what types of programs you'll be running). Make sure that the computer can be upgraded.
Scanner: This device can input written documents, pictures or photographs directly into your computer. There are three types of scanners: handheld, hopper-feed and flatbed.
Sound Card: This device allows your computer to reproduce music, sounds and recorded voices. Make sure you have a sound card if you're planning to play multimedia games.
Video Card: The video card is the part of the computer that sends the images to the monitor.
Computer Buyer's Checklist-
Before you walk into a computer store or call a mail order source, go over the list of the items (hardware and software) that you might consider purchasing. Ask the salesperson questions about the computer you are interested in and jot down your notes.
Processor type
_____________________________________________
Processor Speed in MHz
_____________________________________________
RAM (memory)
_____________________________________________
Cache
_____________________________________________
Hard Drive Capacity
_____________________________________________
Sound & Video Card
_____________________________________________
Monitor Size? Is it included in the price?
_____________________________________________
Printer: Is it included in the price?
_____________________________________________
Type of Printer (inkjet, bubble jet, laser)
_____________________________________________
Modem (internal, external, speed)
_____________________________________________
Can you set up a fax or voice mail on the modem?
_____________________________________________
Is there a toll-free technical support phone number?
_____________________________________________
What cables are needed to set up the system?
_____________________________________________
Are there any additional accessories that might be useful, e.g., storage cases, furniture, extra cabling, anti-glare screen for monitor?
________________________
Jun 3, 2008
How to Import Windows Registry Files
Windows Registry settings can be imported from a previously exported file. This procedure describes the import function in regedit, the Windows Registry Editor, in Windows 95 and Windows 98.
Step1
Step2
Step3
Step4
Step5
Step6
Click OK to import the registry file.
Jun 2, 2008
Quicklaunch your USB workspace
I got this article from www.lifehacker.com and it's really amazing, that's why I'm posting it right here in my blog. You may also visit the link below to read more related topics.
http://lifehacker.com/software/portable-applications/hack-attack-quicklaunch-your-usb-workspace-182792.php
The proliferation of portable applications makes it more and more convenient to carry your life on a thumb drive, especially if you don't do all of your work and play from one computer.
But it could be easier. Rather than plugging in your thumb drive and clicking through your drive's file system to open every program and document, wouldn't it be nice if your workspace launched automatically? Today we'll set up your thumb to Autoplay, so that you can instantly launch your preferred workspace on any computer. All you have to do is plug in.
First of all, there are a crapload of programs that you can run off your thumb drive. I'll be using a few programs just to give you an idea of how this works, but your imagination is the limit when it comes to what you can run off the thumb drive. For a rundown of several different options, check out Gina's life on a thumb drive feature.
Setting up Autoplay

The key to this whole thing is a Windows "feature" called Autoplay. Although it's caused a bit of controversy in its time, Autoplay remains enabled on most Windows computers. Don't worry - in this case we're going to be using Autoplay purely for good.
Setting up Autoplay is a no-brainer. Create a new text file on the home directory of your thumb drive and name it autorun.inf. There are a number of different ways to deal with autorun.inf, but to keep things simple, I'm just going to use it to run a batch file that will set up our workspace (batch files are easy, and we've used batch scripts several times before, so they should be pretty familiar).
Copy and paste the following text into your autorun.inf text file:
[autorun]
open=launch.bat
ACTION = Launch portable workspace
That's really all there is to it. Next time you plug in your thumb drive, Autoplay should give you the option to "Launch portable applications." Now all that's left to do is create our launch.bat batch file, which will tell us exactly what we want to run when we plug in our thumb drive.
Setting up launch.bat
In the same directory as your autorun.inf file, create a new text file and name it launch.bat. From this point on, we're pretty much dealing with quick launch workspaces, though we're looking for ideas that will work well on a portable drive. For example, you could set up your thumb drive to automatically launch:
- Tiddlywiki:
If you use Tiddlywiki (and I know a lot of Lifehacker readers love it), you could easily launch it with the following batch script:
start tiddlywiki\tiddlywiki.htmlKeep in mind that you never want to use the drive name when you're setting up your batch script, as this is likely to change depending on what computer you're plugged into. Instead, just omit the drive letter altogether and start with the folder or file name that you want to open.
- Portable applications:

Pretty simple, huh? Of course, if you wanted to open Tiddlywiki in your own portable browser, like Portable Firefox, you'd want to tweak this a little bit. Here's what I'd change it to (omitting line breaks):
start portableapps\portablefirefox.exe tiddlywiki\tiddlywiki.html
Easy peasy. Now you can automatically run Tiddlywiki on Portable Firefox as soon as you plug in your thumb drive. The same structure will work for pretty much any portable app you run on your computer. If you want to launch more than one application when you plug in your thumb drive, it's just as easy; just add a couple more lines to your launch.bat script. For example:
start portableapps\portablefirefox.exe tiddlywiki\tiddlywiki.html
start portableapps\portablethunderbird.exe
start portableapps\portableopenoffice.exe
start portableapps\pstart.exe
will open Tiddlywiki in Portable Firefox, along with Portable Thunderbird, Open Office, and Filezilla. When it comes to organizing and launching apps from your thumb drive after you're all plugged in, PStart is a good start menu for the thumb drive. My favorite application launcher, Launchy, would be even better for launching apps directly off your thumb drive, but it's not quite ready for that yet (it was really very close).
- App launchers:
You can still make use of other app launchers, though. If you're not into bringing portable applications with you, but you still don't feel like digging through the Start menu of the computer you're plugged into, it can be very nice to have an app launcher by your side.

Both Colibri and SlickRun can handle this, as it's just a matter of installing the programs to your thumb drive (Colibri even has an install setting specifically for portable use).
Again, you can launch pretty much whatever program or file you've got on your thumb drive at this point - it's really just a matter of what you fits your needs. For more ideas, check out my quick launch workspaces. If you still don't understand the worth of portable applications or drives, check out Gina's life on a thumb drive. Once you get your Autoplaying thumb drive tweaked to your liking, who knows - maybe you'll be ditching your laptop for a thumb drive in the near future. God knows thumb drives are a lot easier on the wallet.
Assign a custom icon to your USB flashdrive

Simply find an .ico file you want to use (favicons from websites work nicely).... name your .ico file autorun.ico and put it in the root of your drive then create a text file called autorun.inf in the root of the drive and put this inside it:
[autorun]
icon=autorun.ico
Subscribe to:
Posts (Atom)